Backend Manager
The Backend Manager is the unified dialog for managing all backend configurations. Through it, you can add, edit, delete, and verify backend connections.
How to Open
- Menu: Tools → Backend Manager
Interface Layout
┌─────────────────────────────────────────────────┐
│  Backend Manager                        [Cancel] [Save] │
├─────────────────────────────────────────────────┤
│  [ACP] [SkillRunner] [Generic HTTP]              │
├─────────────────────────────────────────────────┤
│  ACP                                   [Add ACP] │
│                                                 │
│  ┌─ Display Name: [________]  ─┐               │
│  │  Command:      [________]    │               │
│  │  Arguments:    Arguments Editor │             │
│  │  Env Variables: Env Var Editor  │  [Remove]  │
│  └──────────────────────────────┘               │
│                                                 │
│  ┌─ Display Name: [________]  ─┐               │
│  │  ...                       │  [Remove]      │
│  └──────────────────────────────┘               │
└─────────────────────────────────────────────────┘
General Operations
Tab Switching
There are three tabs at the top of the dialog: ACP, SkillRunner, and Generic HTTP. Click a tab to switch to the corresponding backend type configuration area. Each tab lists all configured backends of that type.
Adding a Backend
Click the Add button under a tab to create a new blank configuration row for that type. Fill in the fields and click Save in the bottom-right corner to apply.
Editing a Backend
Modify fields directly in the configuration row. Unsaved changes will not take effect.
Deleting a Backend
Click the Remove button within a configuration row to delete that backend. Deletions take effect after saving.
Save & Cancel
| Button | Location | Function |
|---|---|---|
| Save | Bottom-right of the dialog | Save all changes and close the dialog |
| Cancel | Bottom-right of the dialog (next to Save) | Discard all unsaved changes and close the dialog |
If there are unsaved changes before closing the dialog, a confirmation prompt will appear.
ACP Tab
ACP backends are locally running agent subprocesses. The configuration specifies the launch command, and the plugin manages the process lifecycle.
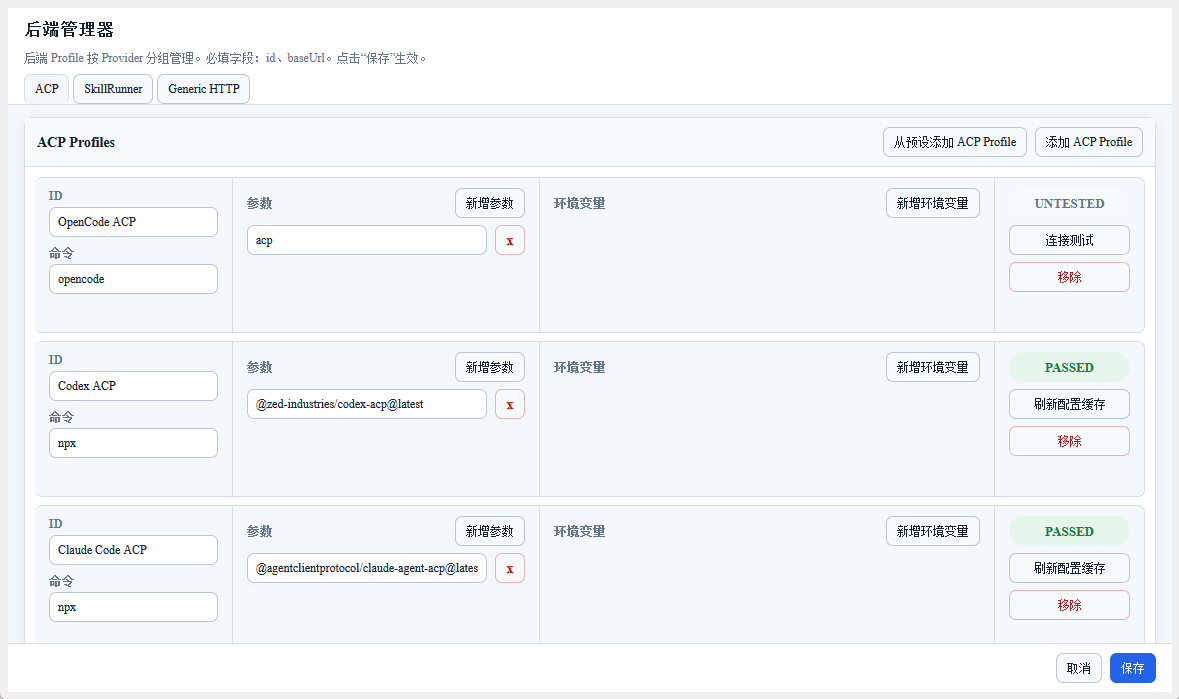
Field Descriptions
| Field | Required | Description |
|---|---|---|
| Display Name | Yes | Display name for the backend, used to identify it in the Dashboard and sidebar |
| Command | Yes | Command to start the ACP backend (e.g., npx -y opencode-ai@latest acp) |
| Arguments | No | Additional arguments for the command, added one by one through the arguments editor |
| Environment Variables | No | Additional environment variables, added one by one through the environment variable editor (key-value pairs) |
ACP 프리셋
ACP 탭 상단에 프리셋에서 추가 버튼이 있습니다. 클릭하면 프리셋 구성 창이 열립니다: 왼쪽에서 Agent를 선택하고 오른쪽에 시작 옵션과 읽기 전용 구성 미리보기가 표시됩니다. 확인을 클릭하면 플러그인이 미리보기 내용을 기반으로 일반 ACP 구성 행을 추가합니다. 취소를 클릭하면 현재 구성이 변경되지 않습니다.
- npx로 시작: 활성화하면
npx <package>형식으로 전환되고 Node.js 및 npm 설치 필요 안내와 Node.js 공식 웹사이트 링크가 표시됩니다. Codex와 Claude Code는 ACP 어댑터에 의존하므로 기본적으로 활성화되어 있으며, 다른 Agent는 기본적으로 활성화되어 있지 않습니다. - 격리 환경: 격리를 지원하는 Agent에서만 사용할 수 있습니다. 활성화하면 해당 환경 변수가 미리보기에 주입되고, 해당 격리 디렉토리에서 Agent 옵션과 인증을 직접 관리해야 한다는 안내가 표시됩니다.
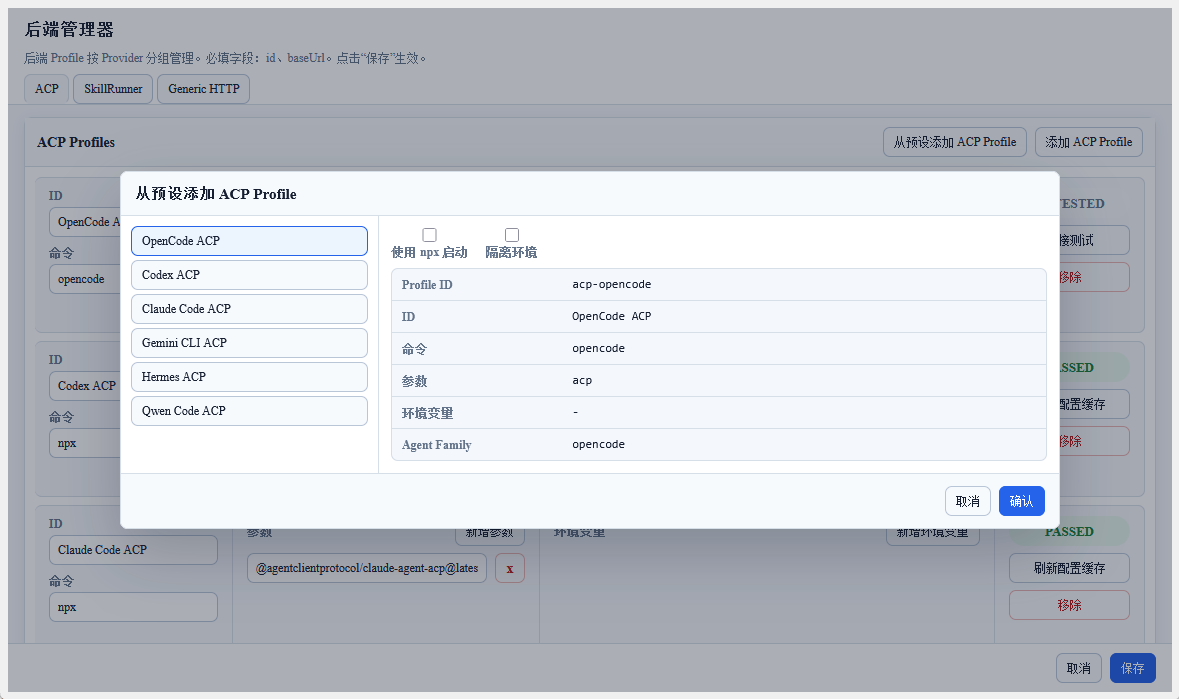
미리보기 영역은 읽기 전용이며 Profile ID, 표시 이름, 명령, 인수, 환경 변수 및 Agent Family를 포함합니다. 추가된 구성 행은 일반 ACP 백엔드로 계속 편집할 수 있습니다.
내장 프리셋의 기본 명령:
| 프리셋 | 기본 명령 | 설명 |
|---|---|---|
| OpenCode | opencode acp | OpenCode ACP 백엔드; OPENCODE_CONFIG_DIR를 통한 구성 디렉토리 격리 지원 |
| Codex | npx -y @agentclientprotocol/codex-acp@latest | OpenAI Codex용 ACP 어댑터 |
| Claude Code | npx -y @agentclientprotocol/claude-agent-acp@latest | Claude Code용 ACP 어댑터 |
| Gemini CLI | gemini --experimental-acp | Gemini CLI ACP 모드 |
| Hermes | hermes acp | Hermes Agent ACP 백엔드 |
| Qwen Code | qwen --acp --experimental-skills | Qwen Code ACP 모드 |
| GitHub Copilot | copilot --acp --stdio | GitHub Copilot CLI ACP 모드 |
| Qoder CLI | qodercli --acp | Qoder CLI ACP 모드; QODER_CONFIG_DIR를 통한 구성 디렉토리 격리 지원 |
| Cursor Agent ACP | cursor-agent-acp | Cursor Agent ACP 어댑터; --session-dir를 통한 세션 디렉토리 격리 지원 |
| DeepAgents | deepagents-acp | DeepAgents ACP 어댑터 |
| Auggie | auggie --acp | Auggie ACP 모드 |
| Kilo | kilo acp | Kilo Code ACP 모드 |
| Cline | cline --acp | Cline ACP 모드 |
| CodeBuddy | codebuddy --acp | CodeBuddy ACP 모드 |
| Grok | grok agent stdio | Grok agent stdio 모드 |
OpenCode, Codex, Claude Code, Gemini CLI, Qwen Code 및 Hermes Agent만 테스트되었습니다. 다른 ACP 백엔드의 사용 가능성은 구현에 따라 다르며, 이 플러그인은 이에 대해 보장하지 않습니다.
Action Buttons
| Button | Function |
|---|---|
| Refresh Runtime Options | Re-detect the backend's model list, mode list, and other runtime capabilities |
Arguments Editor
Add Argument: Click the add button and enter the argument content. Remove Argument: Click the remove button next to the argument.
Environment Variable Editor
Add Environment Variable: Click the add button and fill in the Key and Value. Remove Environment Variable: Click the remove button next to the variable.
SkillRunner Tab
SkillRunner backends communicate with Skill-Runner services via HTTP API, supporting both local and remote deployment modes.
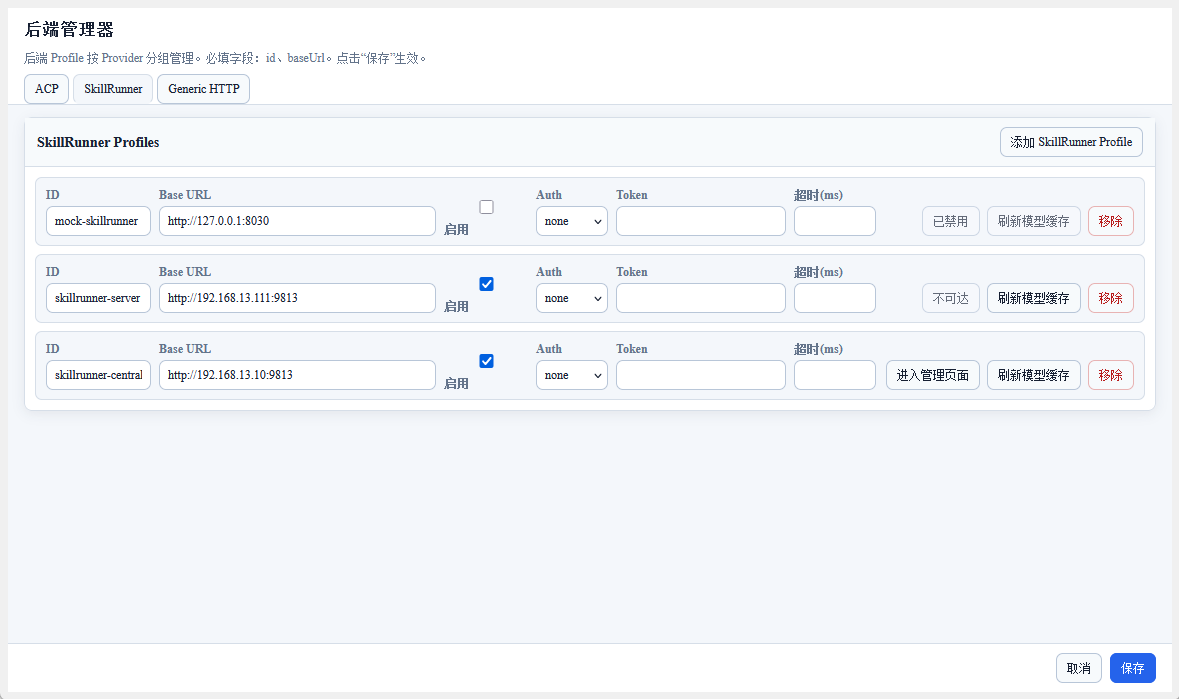
Field Descriptions
| Field | Required | Description |
|---|---|---|
| Display Name | Yes | Display name for the backend |
| Base URL | Yes | Address of the Skill-Runner service (e.g., http://127.0.0.1:29813) |
| Authentication | No | Select none (no authentication) or bearer (Bearer Token authentication) |
| Auth Token | No | Bearer Token (only fill in when authentication is set to bearer) |
| Timeout | No | Request timeout (milliseconds) |
Action Buttons
| Button | Function |
|---|---|
| Open Management UI | Open the Skill-Runner built-in Web management interface |
| Refresh Model Cache | Refresh the model list cache for this backend |
Generic HTTP Tab
Generic HTTP backends are used to send requests to any HTTP service, primarily for calling external APIs (such as the MinerU document parsing service).
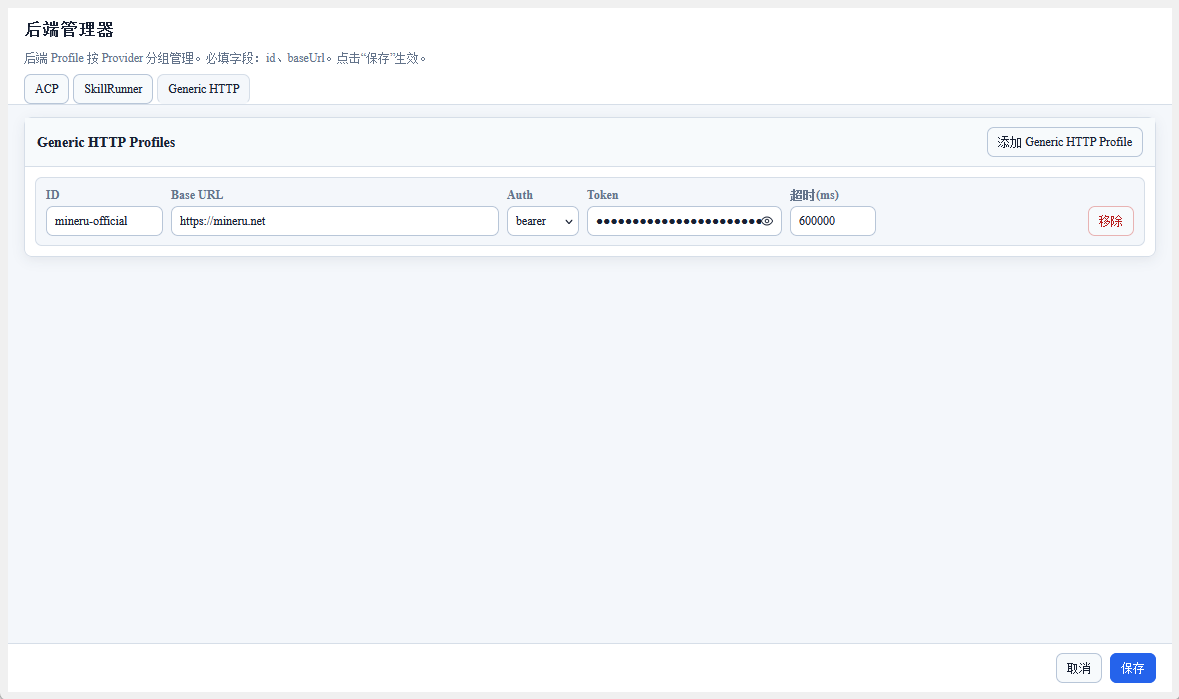
Field Descriptions
| Field | Required | Description |
|---|---|---|
| Display Name | Yes | Display name for the backend |
| Base URL | Yes | Base address of the HTTP service |
| Authentication | No | Select none or bearer |
| Auth Token | No | Bearer Token (only fill in when authentication is set to bearer) |
| Timeout | No | Request timeout (milliseconds) |
Backend Capability Detection
After saving a backend, the plugin automatically detects backend capabilities in the background:
- ACP: Checks command availability, connection initialization, model list, mode list, and computes a configuration fingerprint to detect subsequent changes
- SkillRunner: Checks API availability, engine list, model list
- Generic HTTP: Checks HTTP endpoint reachability
Detection results are displayed as backend status indicators in the Dashboard and sidebar.
Next Steps
After configuration is complete, you can:
- Use the ACP backend in ACP Chat or ACP Skills
- Manage SkillRunner runs through the SkillRunner Tab
- Use the configured backends to execute tasks in the Workflow List and Dashboard